Qt 静态编译
Windows环境 - 静态编译:
准备阶段
安装 Visual Studio 2022、安装Qt5.15.2动态库版本 安装python3、安装Perl、安装Ruby;
下载Perl: https://strawberryperl.com/releases.html
下载Ruby: https://github.com/oneclick/rubyinstaller2/releases/tag/RubyInstaller-3.0.3-1
下载源码:https://download.qt.io/archive/qt/5.15/5.15.2/single/
添加Perl、Python、Ruby以及gnuwin32到Path环境变量(gnuwin32工具包含在QT源文件根目录下):
修改源码qt-everywhere-src-5.15.0\qtbase\mkspecs\common\msvc-desktop.conf配置
将
1 | QMAKE_CFLAGS_RELEASE = $$QMAKE_CFLAGS_OPTIMIZE -MD |
改为
1 | QMAKE_CFLAGS_RELEASE = $$QMAKE_CFLAGS_OPTIMIZE -MT |
PS: D的意思是动态编译(dynamic link),T的意思是静态编译(static link)
MSVC32编译
使用 x86 Native Tools Command Prompt for VS 2022 工具进行编译
MSVC64编译
使用x64 Native Tools Command Prompt for VS 2022 Current
PS:编译32位库和64位库只有此处不同
输入命令:
1 | configure -confirm-license -opensource -platform win32-msvc -debug-and-release -static -static-runtime -force-debug-info -opengl dynamic -prefix "E:/QT5.15.2_Static/msvc_32" -qt-sqlite -qt-pcre -qt-zlib -qt-libpng -qt-libjpeg -opengl desktop -qt-freetype -nomake tests -no-compile-examples -nomake examples |
-prefix 代表构建目录,是编译完成后,头文件和库文件的输出路径,建议这里的文件夹名全英文,否则可能会在最后nmake install 报copy命令语法不正确的错误
-shared -static 表示生成动态或静态库,不指定此参数默认是动态库
-release 生成release发布版,或指定 -debug调试版
-nomake 指定不编译输出的子文件夹
-skip 指定跳过编译的子模块
-opensource 表示编译开源版本,相对的是 -commercial ,表示编译商业版本
-confirm-license 表示确认许可协议
编译动态库输入(无需修改配置文件)
1 | configure -confirm-license -opensource -platform win32-msvc -debug-and-release -shared -force-debug-info -opengl dynamic -prefix "E:/QT5.15.2_S/msvc_32" -qt-sqlite -qt-pcre -qt-zlib -qt-libpng -qt-libjpeg -opengl desktop -qt-freetype -nomake tests -no-compile-examples -nomake examples |
编译文件生成后进行编译,输入
执行完成后输入nmake
执行完成后输入nmake install
编译完成后添加到Qt Versions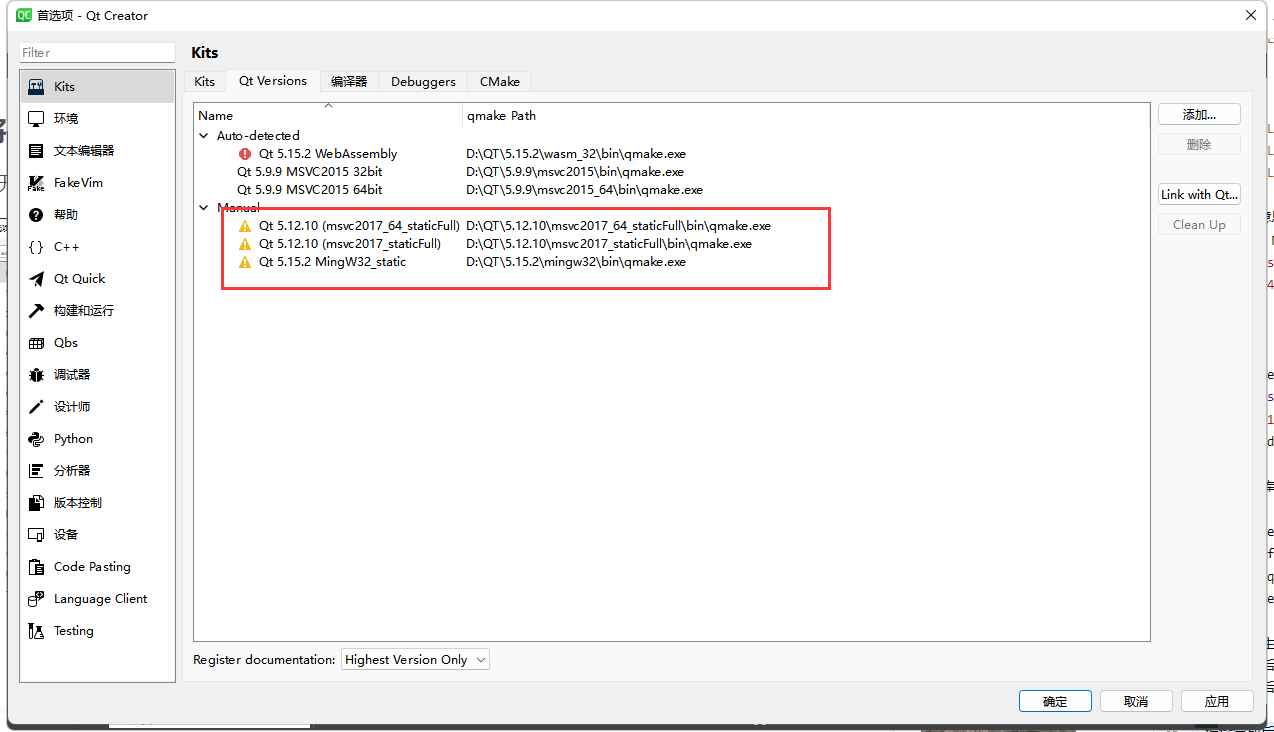
添加Kit 编译套件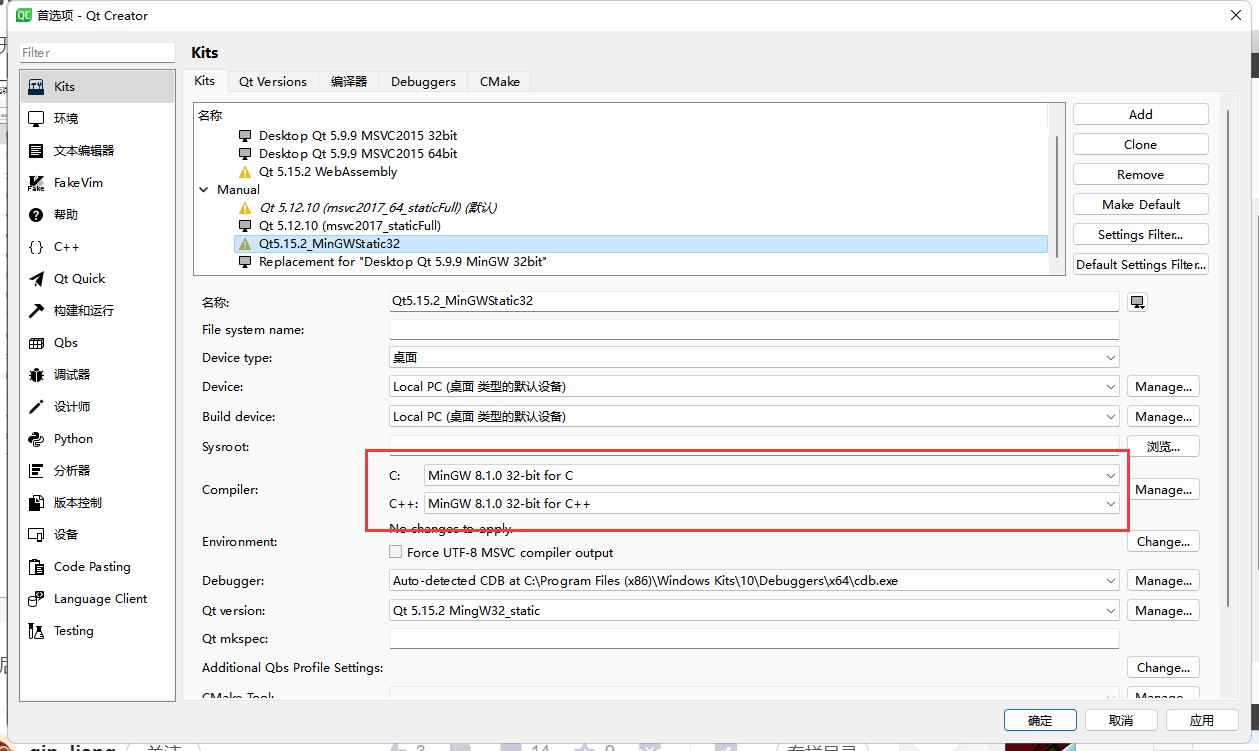
PS:红色方框部分,添加的Compiler要和编译用的一致
MingW32编译
1.占用控件较大,预计75G或者更多
2.设置环境变量
3.创建一个脚本文件名为build_env.bat
以下内容复制到该脚本文件中
1 | set PATH=D:\QT\Tools\mingw810_32\bin;D:\QT\Tools\mingw810_32\opt\bin;E:\tool\QT-5.15.2\src\qt-everywhere-src-5.15.0\gnuwin32\bin;C:\WINDOWS\System32;C:\Windows\System32\WindowsPowerShell\v1.0;C:\Windows\System32\wbem;C:\WINDOWS |
在源码文件夹建一个build文件夹,切换到build文件夹中,
编译静态库:
1 | ..\configure.bat -confirm-license -opensource -platform win32-g++ -debug-and-release -static -static-runtime -force-debug-info -opengl dynamic -prefix "E:/tool/Qt5.15.2/mingw_32" -qt-pcre -qt-zlib -qt-libpng -qt-libjpeg -opengl desktop -qt-freetype -nomake tests -no-compile-examples -nomake examples |
编译动态库
1 | ..\configure.bat -confirm-license -opensource -platform win32-g++ -debug-and-release -static -static-runtime -force-debug-info -opengl dynamic -prefix "E:/tool/Qt5.15.2/mingw_32" -qt-pcre -qt-zlib -qt-libpng -qt-libjpeg -opengl desktop -qt-freetype -nomake tests -no-compile-examples -nomake examples |
编译文件生成完成后输入:
执行 mingw32-make
执行 mingw32-make install
Liunx_AMD64环境:
(没有版本要求可以直接在Qt下载安装)
下载源码,同windows源码下载一样
解压源码
1 | tar xvf qt-everywhere-src-5.15.2.tar.xz |
创建一个安装位置
1 | mkdir Qt5.15.2_Static |
安装编译环境:
1 | sudo apt-get build-dep qt5-default |
创建编译脚本(debug):
1 | ./configure -prefix /home/Qt5.15.2_Static -debug -opensource -confirm-license -no-openssl -no-opengl -qt-xcb -skip qtquickcontrols -skip qtquickcontrols2 -skip qtsensors -skip qtdoc -no-compile-examples |
创建编译脚本(release ):
1 | ./configure -prefix /home/Qt5.15.2_Static -release -opensource -confirm-license -no-openssl -no-opengl -qt-xcb -skip qtquickcontrols -skip qtquickcontrols2 -skip qtsensors -skip qtdoc -no-compile-examples |
参数:
prefix 是一会儿install的路径,如果不制定,就会安装到默认的/usr/local/ 下
debug 是编译debug版本的Qt
opensource 是选定开源版本
confirm-license 是确定下协议
创建编译文件完成
开始编译安装
终端执行:
make -j4
make install
PS:-j4 代表电脑CPU核心,核心越多编译越快
Liunx_ARM环境:
(没有版本要求可以直接应用商店下载安装Qt5)
安装编译环境
sudo apt-cache search aarch64
其他和Liunx_AMD 一致
常见问题就是 一般是缺少依赖,或者版本过低,建议升级依赖项的版本
####参考文章
Qt源码编译configure参数列表:https://blog.csdn.net/qq_37654240/article/details/109639331
wget软件下载:https://www.freedesktop.org/software/
Qt官方源码编译说明:https://doc.qt.io/qt-5/linux-building.html
 wechat
 alipay